Build a shopping cart in Next.js with use-shopping-cart and Stripe
A step-by-step tutorial


Table of contents
- What is use-shopping-cart and why should I use it?
- Creating your Stripe account
- Cloning the starter project
- Installing use-shopping-cart
- Create an .env.local file
- Add cartProvider component
- Add products using the Stripe dashboard
- Adding shopping cart logic to our project
- Using shouldDisplayCart to control shopping cart visibility
- Using handleCartClick to toggle shopping cart visibility
- Using cartCount to keep track of the total products
- Using formatCurrencyString() to format prices
- Using addItem to add to our shopping cart
- Using cartDetails to display shopping cart items
- Using removeItem to remove items from our shopping cart
- Adding Stripe checkout with redirectToCheckout
- Conclusion
Are you looking for an easy way to build a shopping cart for your Next.js website? With the use-shopping-cart library and Stripe, you can quickly and easily create a powerful shopping cart. In this tutorial, I’ll show you how to add Stripe Checkout and shopping cart functionality to a simple pre-built Next.js project. Whether you're building for fun or for business, this tutorial will equip you with the knowledge you need to get started.
Starter code: https://github.com/lmac-1/simple-ecommerce-nextjs
Final code: https://github.com/lmac-1/simple-ecommerce-nextjs/tree/final-version
This tutorial assumes intermediate React and Next.js knowledge, but if you're a beginner, you may be able to follow along too! Give it a try!
What is use-shopping-cart and why should I use it?
Adding Stripe to a project can be confusing at first. While Stripe's documentation is very complete, it can be a bit overwhelming for a Stripe beginner. In addition, finding complementary resources that are both up-to-date and accurate can be a challenge. This is where use-shopping-cart comes in handy. Built by Nick DeJesus, this library includes shopping cart state and logic for Stripe checkout. By abstracting away the complexity of working with Stripe, you can focus on building a great e-commerce experience for your customers without worrying about outdated tutorials and inaccurate information.
In this tutorial, we'll dive into the features and benefits of use-shopping-cart and show you just how easy it is to set up and use in your Next.js project.
Creating your Stripe account
First, let's set up a Stripe account so that you can use Stripe in your application.
You'll need to provide some basic information about yourself. Stripe is only available in certain countries, so if your country isn't available in the dropdown, you can choose a different country for development purposes. My shop is configured for United Kingdom, but you can choose a different country if you like.
When signing up, it will prompt you to fill in your business profile to activate payments on your account. As we're only developing this shop for fun, you can skip this.
Cloning the starter project
I've built a very basic fruit shop using Next.js and TailwindCSS, which we will use during this tutorial. I recommend cloning the project and following along for the best experience.
Clone the starter project by running the following command:
git clone https://github.com/lmac-1/simple-ecommerce-nextjs.git
Enter the project and open up your favourite code editor to view the code:
cd simple-ecommerce-nextjs
Next, run:
npm install
Once that finishes, you can start the development server with:
npm run dev
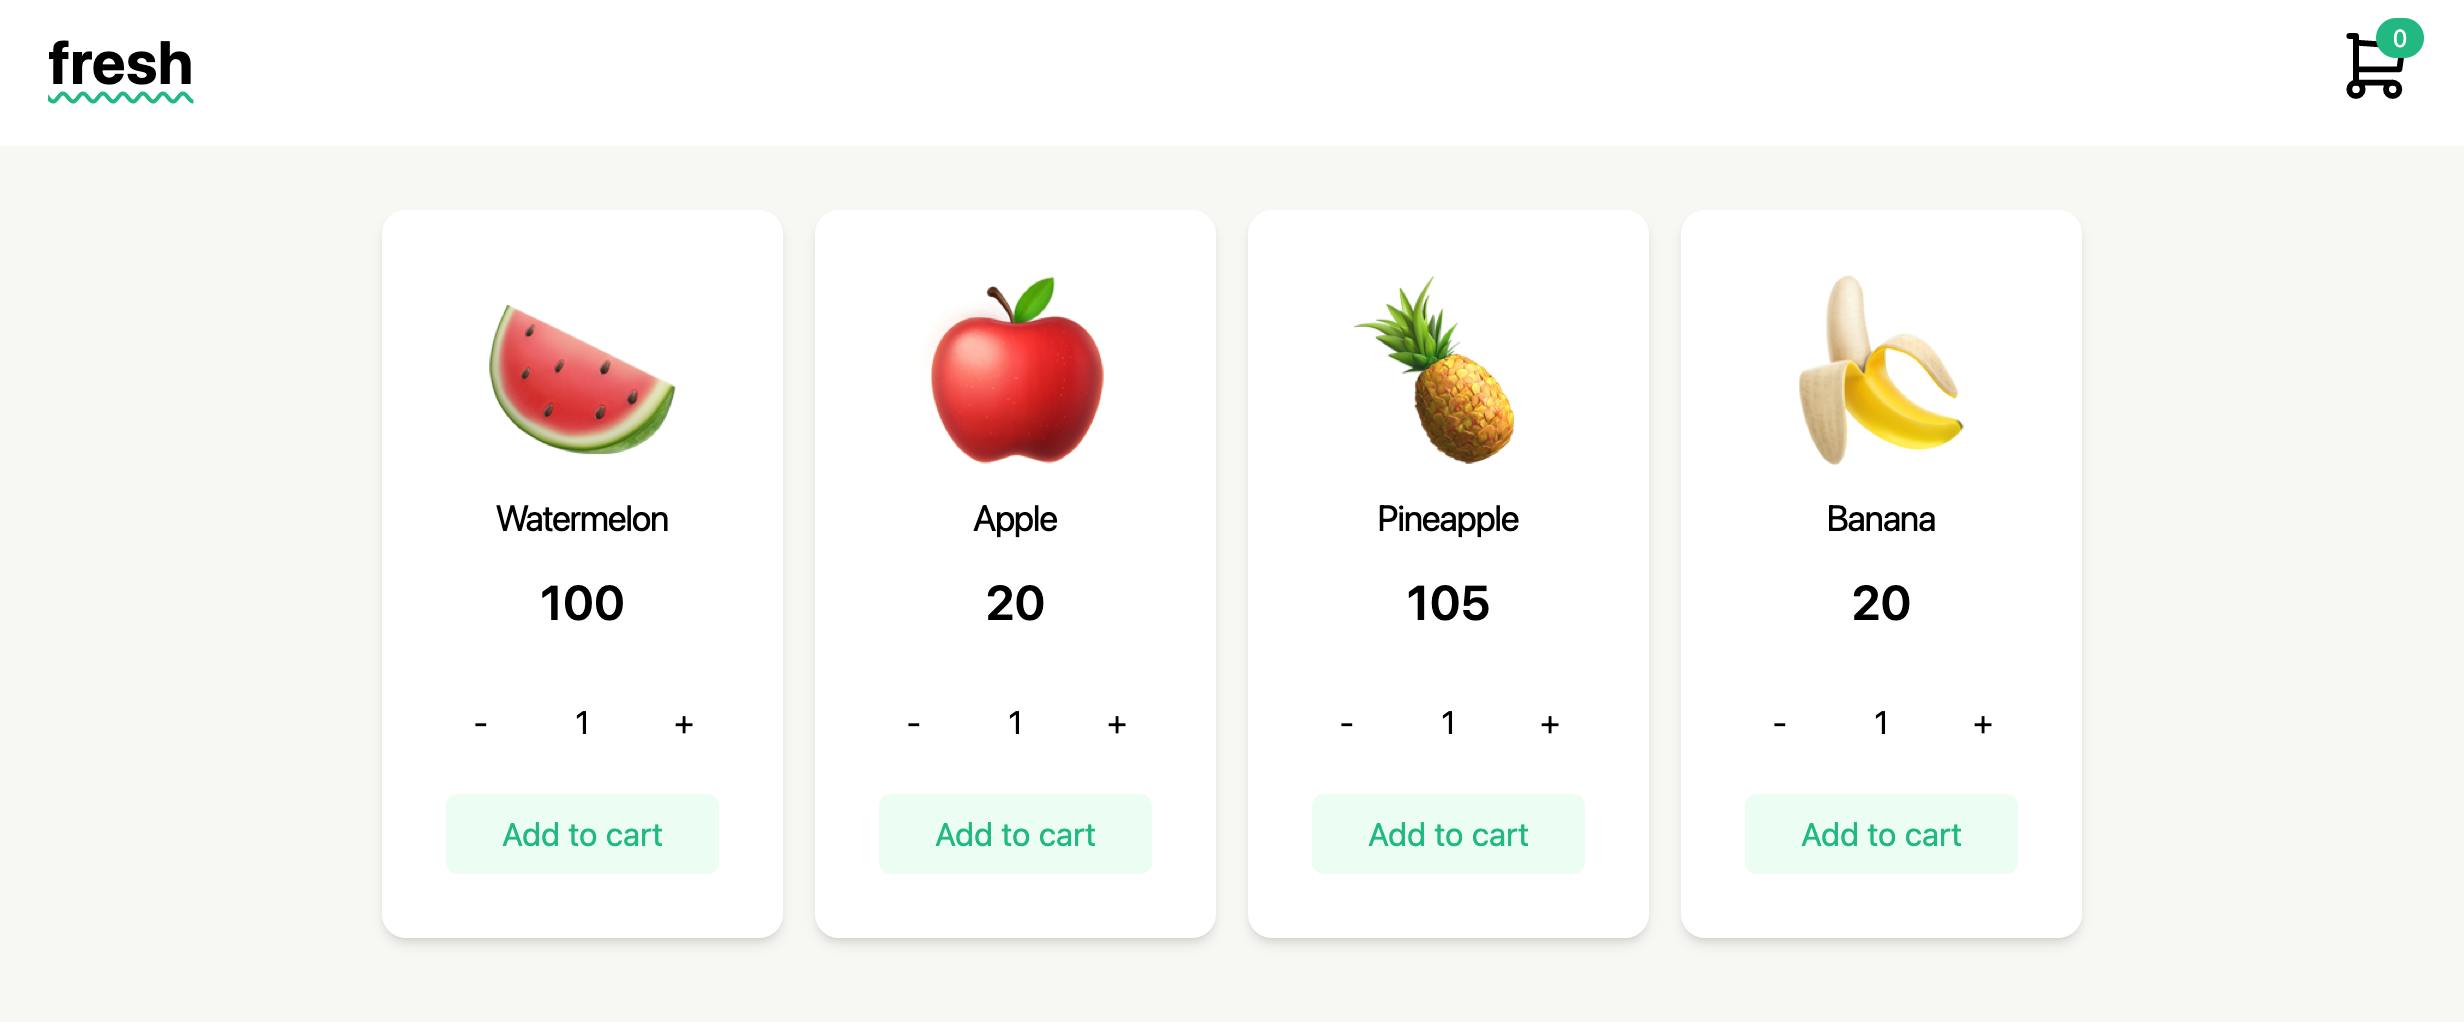
You should see a site that looks a bit like this (the emojis might look a bit different depending on your operating system):
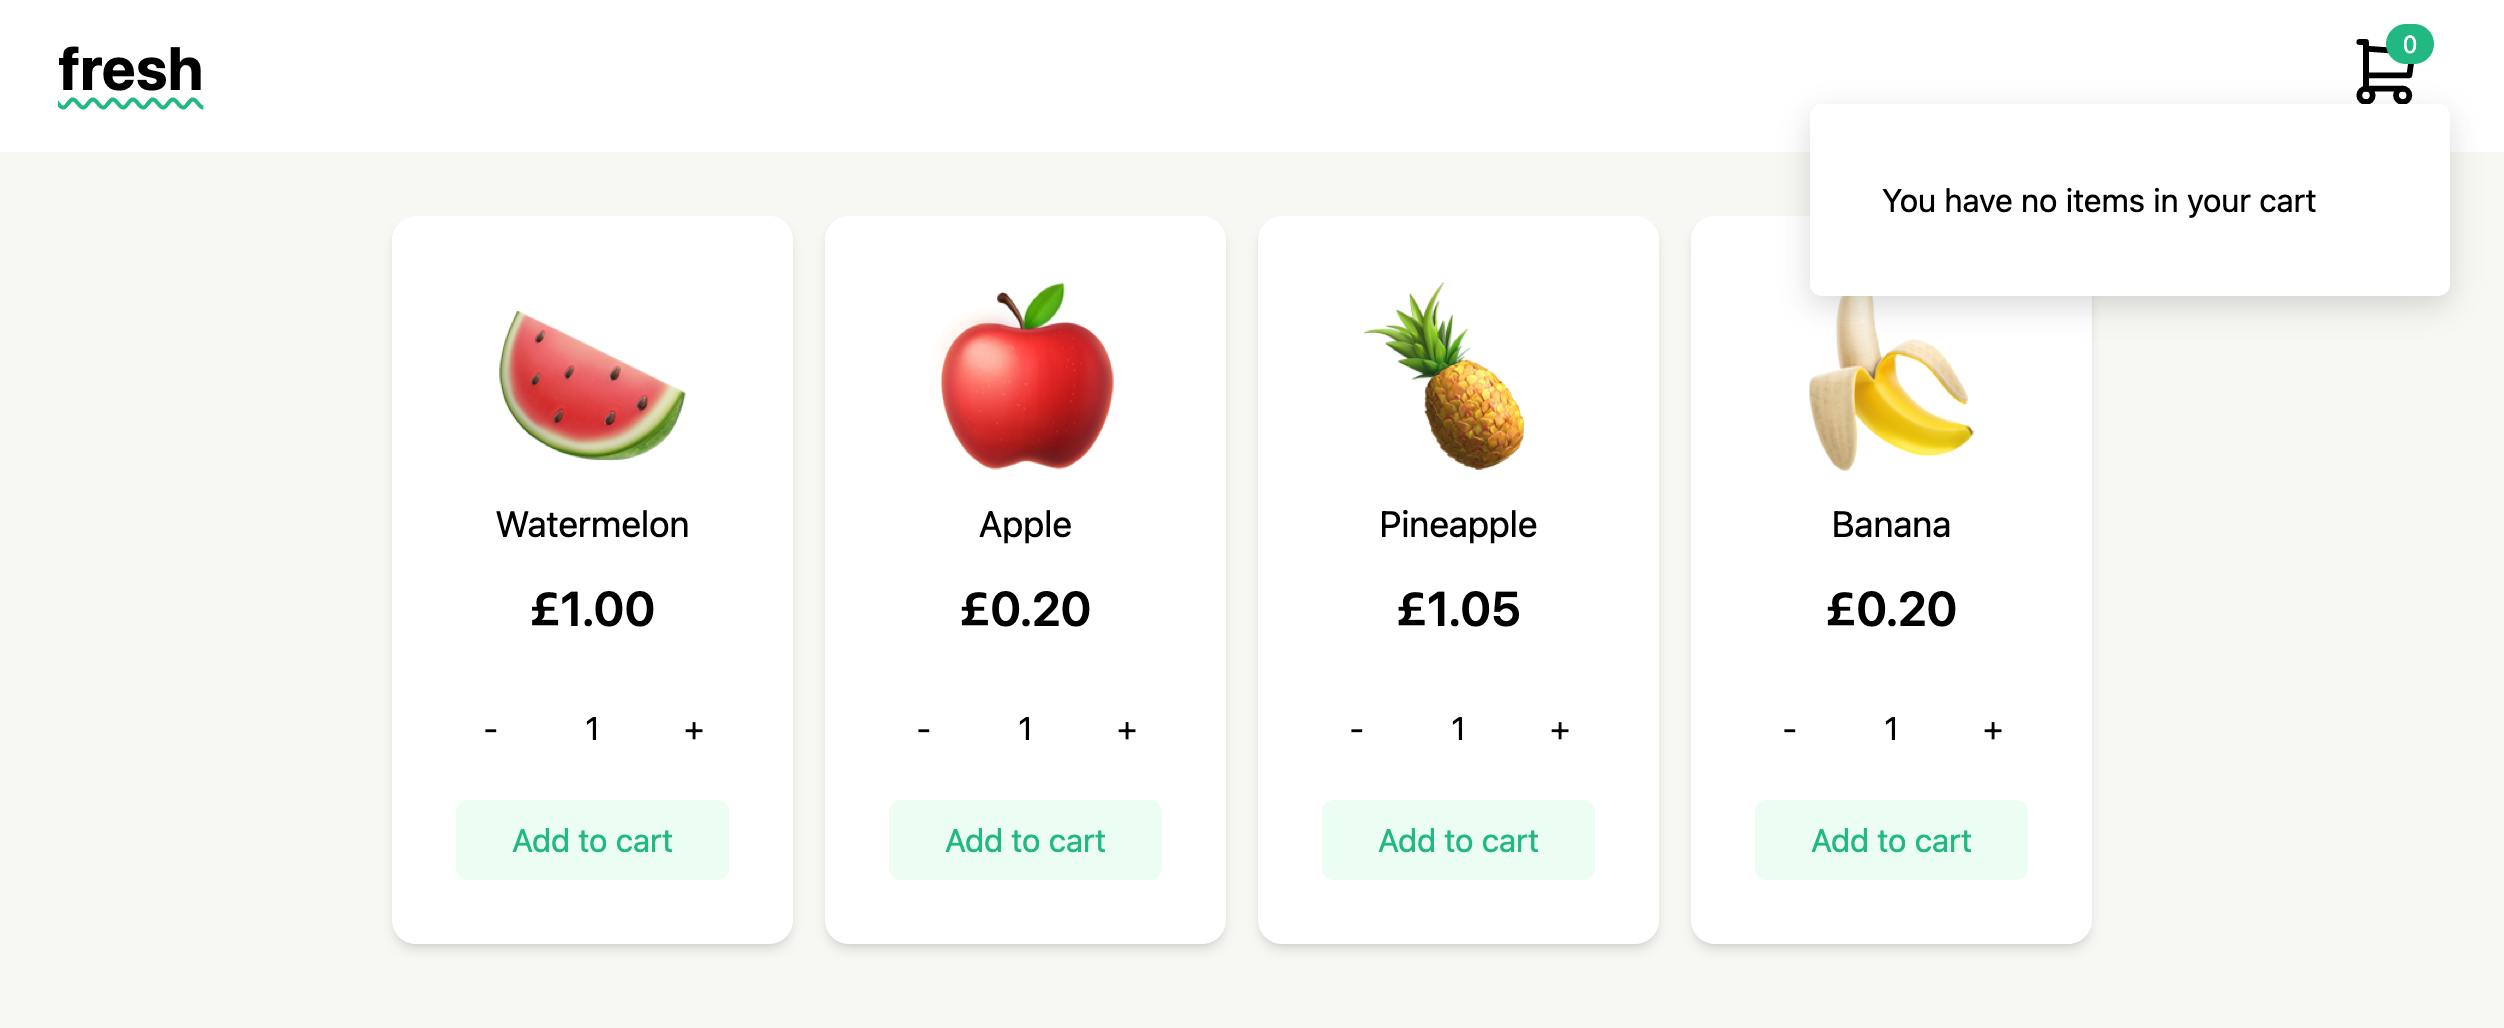
As you can see, the site isn't very functional: the shopping cart is permanently open with no products and we can't add anything to our shopping cart.
Let's change that!
Installing use-shopping-cart
Next, we'll add use-shopping-cart to our project. Run the following command to install the library:
npm install --save use-shopping-cart
Create an .env.local file
To connect to your Stripe account, you'll need to copy your account's publishable key. This can be found on your Stripe Dashboard. You can learn more about Stripe's API keys in their documentation.
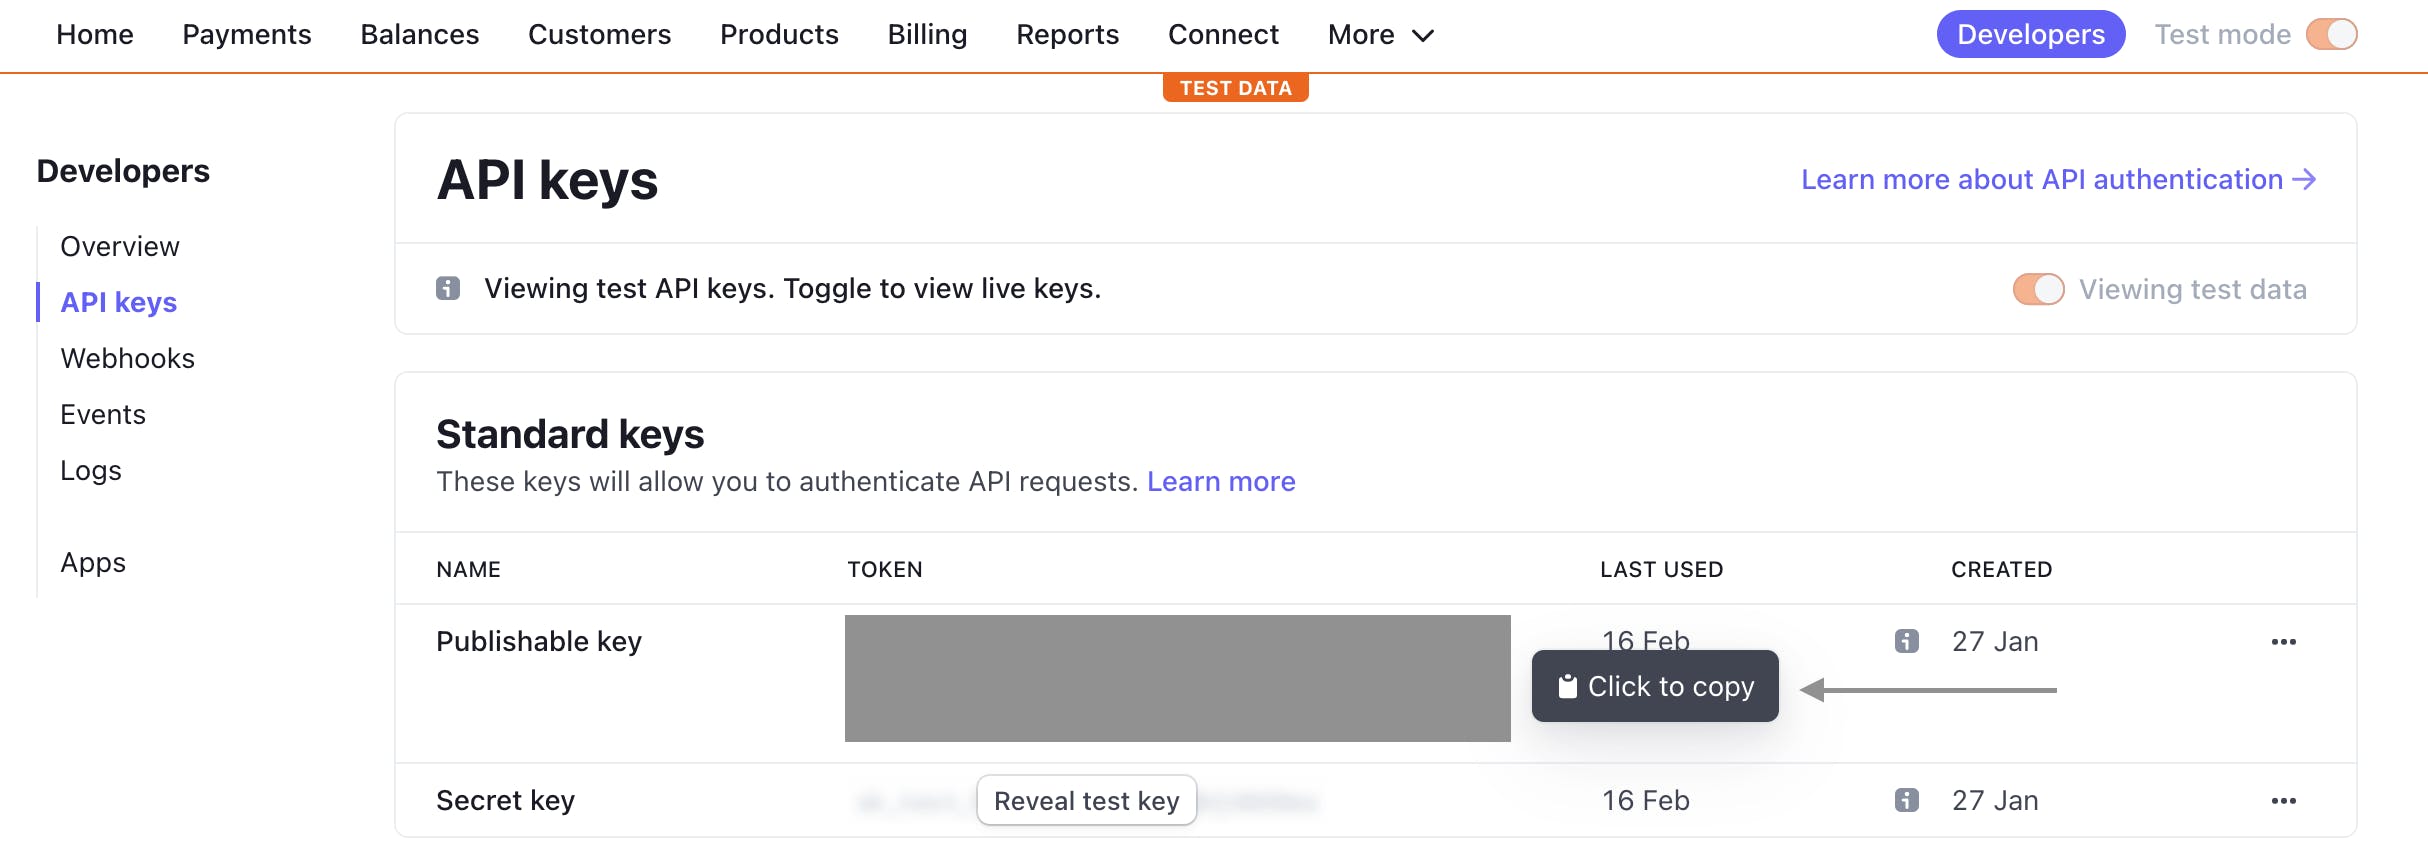
Next, create an .env.local file at the root level of the project with the following (replace yourpublickey with your publishable key):
# Used in successUrl and cancelUrl in CartProvider
NEXT_PUBLIC_URL=http://localhost:3000

# Stripe key
NEXT_PUBLIC_STRIPE_PUBLISHABLE_KEY=yourpublickey
Note: the NEXT_PUBLIC prefix exposes the variable to the browser. In this case, it's okay as your publishable key is only used to identify your account with Stripe – it isn’t secret. But, make sure that you don't use this prefix with other environment variables that are supposed to be kept secret! Learn more about environment variables in Next.js in their documentation.
Add cartProvider component
We need to wrap the root component of our application with <CartProvider/> from use-shopping-cart. This will allow us to access the shopping cart's state and logic from any page or component of our application. For our project, the root component is Layout within the /pages/_app.js file.
Open /pages/_app.js and replace the code with the following to wrap the root component with <CartProvider/>:
import Layout from "@/components/Layout";
import "@/styles/globals.css";
import { CartProvider } from "use-shopping-cart";

export default function App({ Component, pageProps }) {
  return (
    <CartProvider
      mode="payment"
      cartMode="client-only"
      // Connects to your Stripe account
      stripe={process.env.NEXT_PUBLIC_STRIPE_PUBLISHABLE_KEY}
      // Redirected here after successful payments
      successUrl={`${process.env.NEXT_PUBLIC_URL}/success`}
      // Redirected here when you click back on Stripe Checkout
      cancelUrl={`${process.env.NEXT_PUBLIC_URL}/?success=false`}
      currency="GBP"
      // Only customers from UK will be able to purchase
      // Having this setting means that we will capture shipping address
      allowedCountries={["GB"]}
      // Enables local storage
      shouldPersist={true}
    >
      <Layout>
        <Component {...pageProps} />
      </Layout>
    </CartProvider>
  );
}
We are setting up use-shopping-cart in Client Only Mode (cartMode="client-only"). This means that we'll be creating and managing our products on the Stripe dashboard and using Stripe Checkout.
Add products using the Stripe dashboard
Next, we are going to add some products using Stripe's Product Editor.
🧠 Fun fact: You can type product.new in the address bar of any browser to jump straight to Stripe's Product Editor.
We have 4 products on our web application:
Watermelon (£1)
Apple (£0.20)
Pineapple (£1.05)
Banana (£0.20)
Repeat the following steps for each product. You can add the same products and prices as my example, or, change them if you like:
Go to Stripe's Product Editor
In Product information, add the name of the product (e.g. Watermelon)
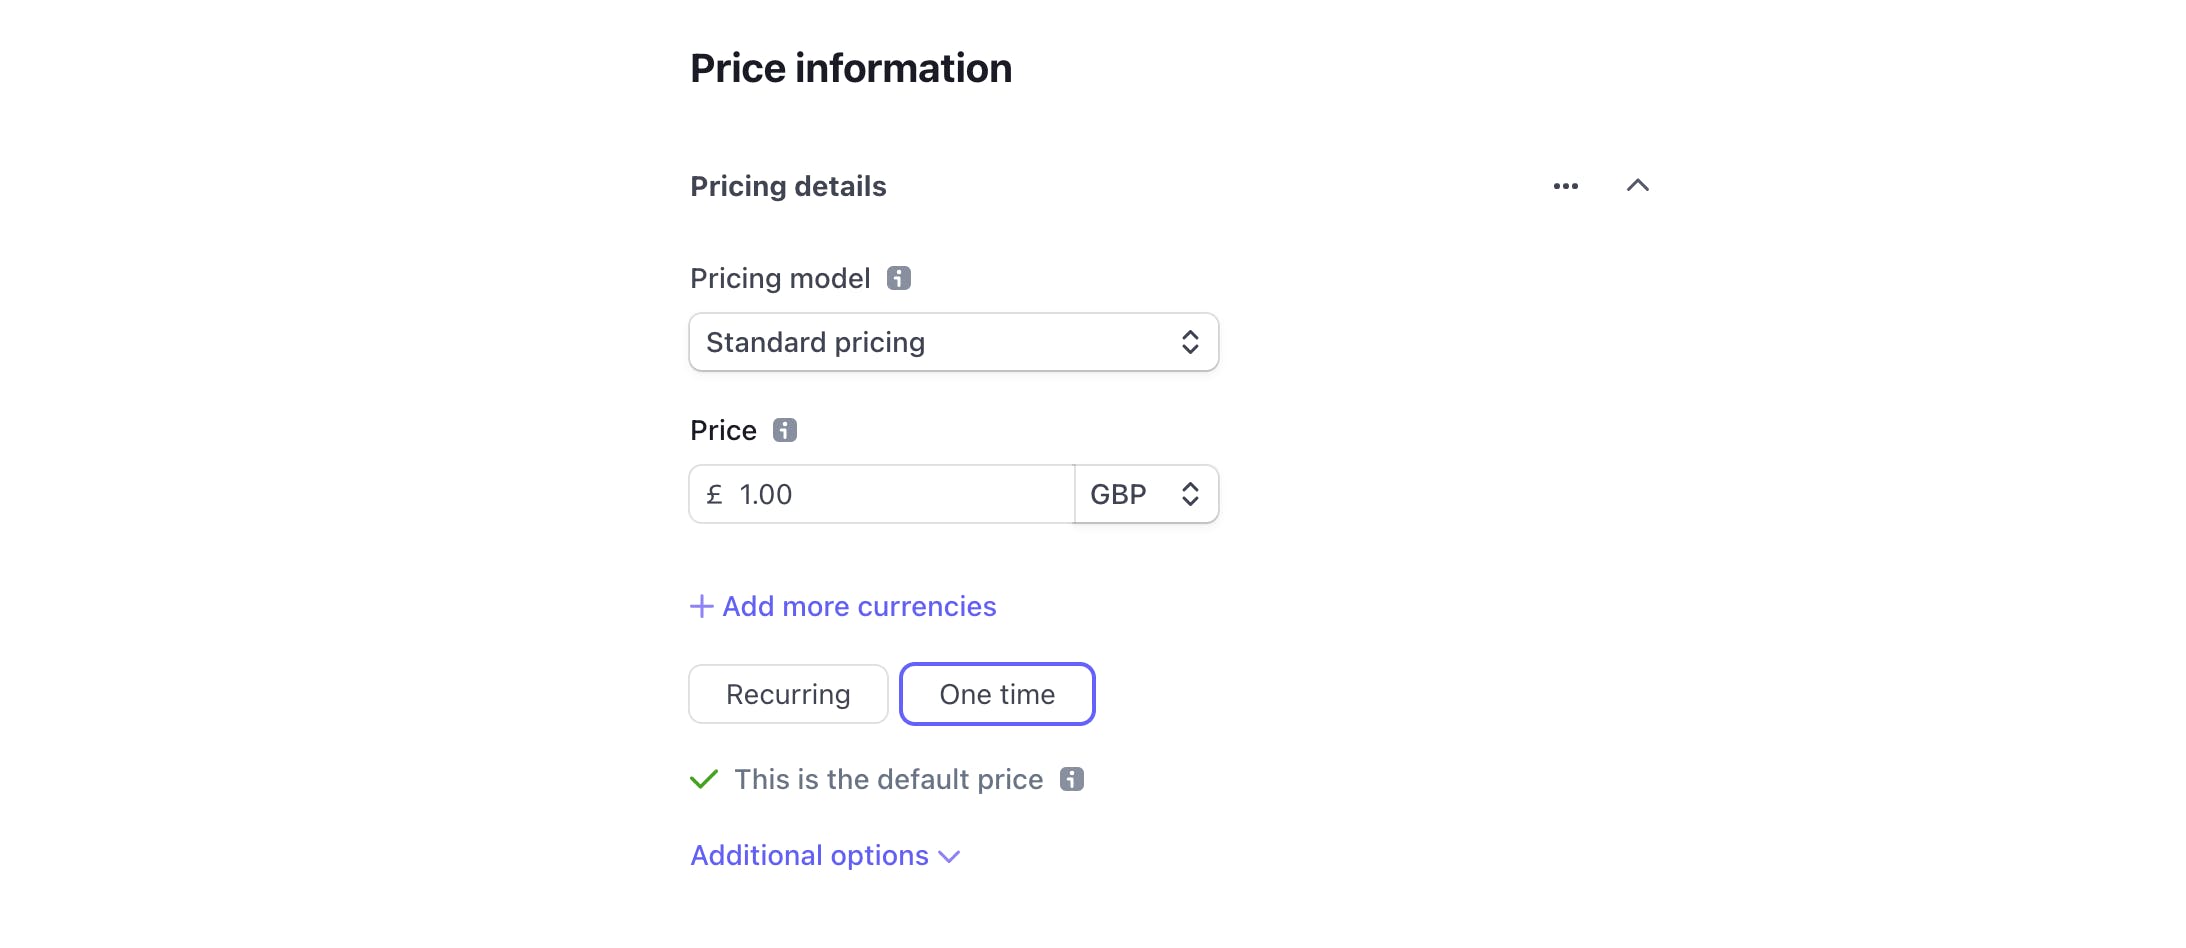
In Price Information, add the price (e.g. £1) and select 'One time' for the type of payment.
Click the Save product button in the top-right corner.
On the Product's page, copy the product's price API ID:
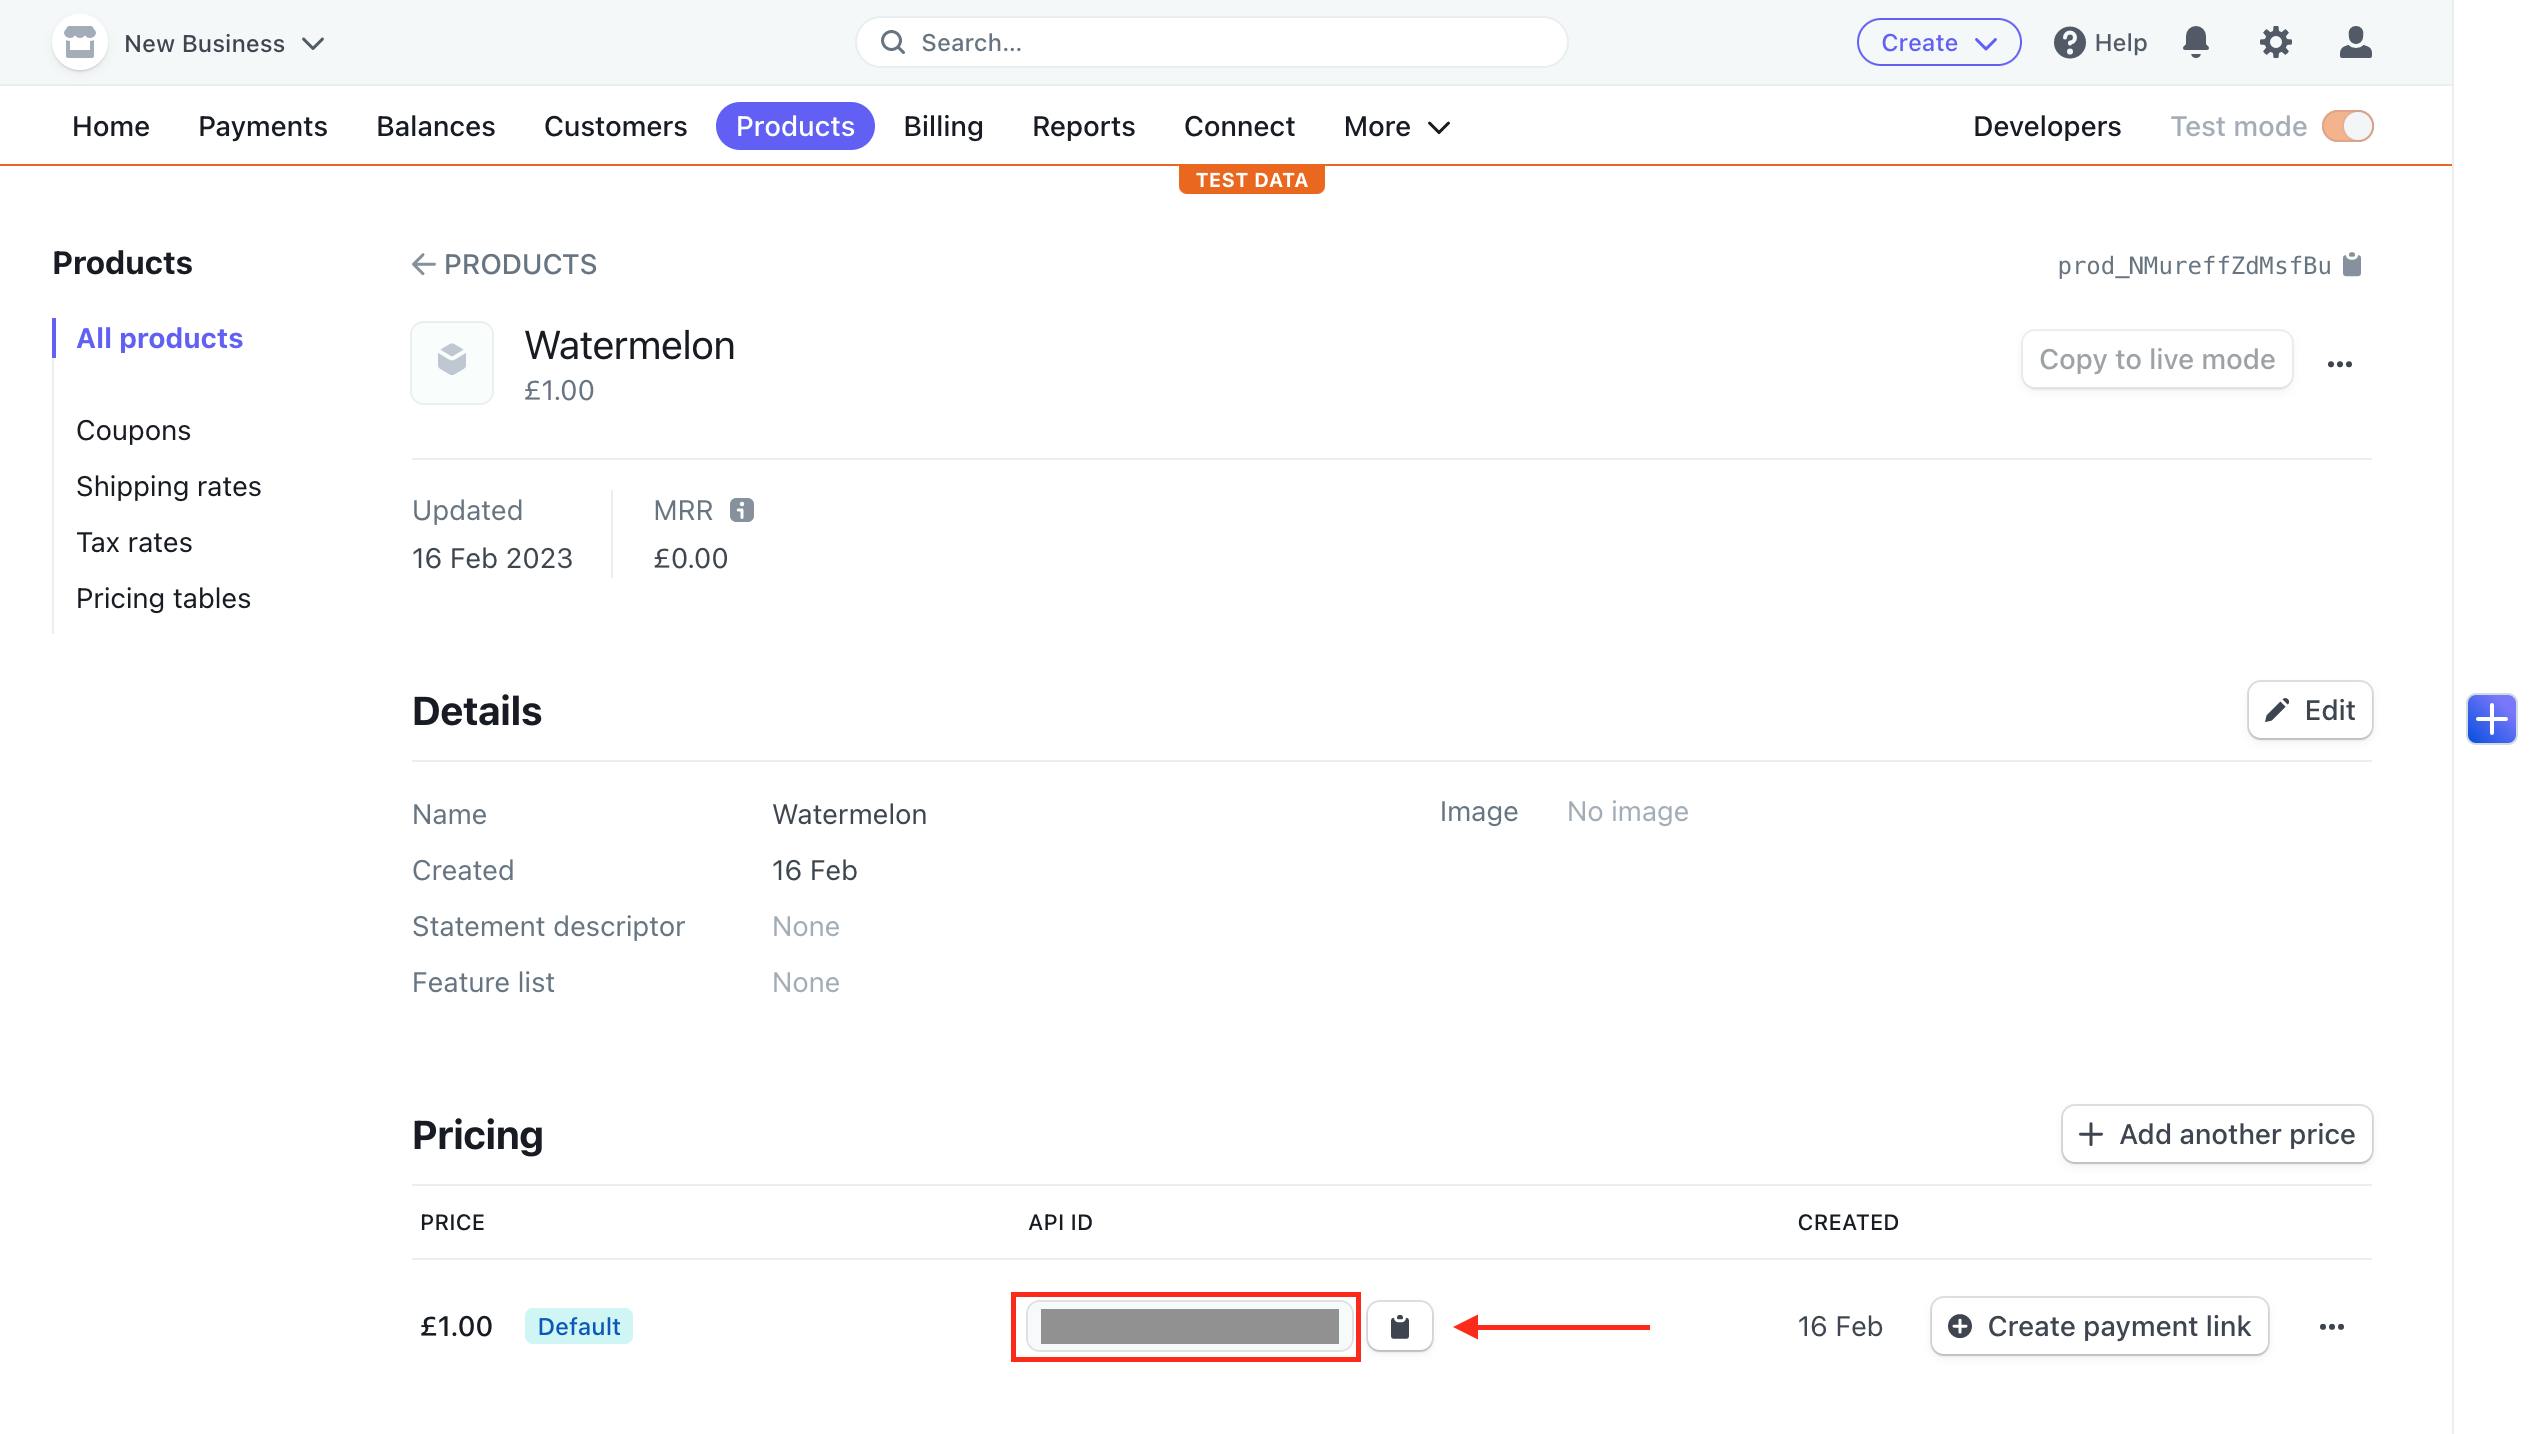
In the
/data/products.jsfile in our application, update theproductsvariable. Replace theidof the product you just created with the API ID that you copied in step 5. You also need to updatepriceto be a number of the price in the smallest currency unit. For example, for GBP, the smallest currency unit is pence and so £1 is equal to 100 pence.
If you have changed any of the product information on Stripe such as the name, price, or emoji, make sure to also update it.export const products = [ // updated product { // price's API ID goes here id: "yourproductidgoeshere", name: "Watermelon", // price in smallest currency unit (100 pence = £1) price: 100, emoji: "🍉", currency: "GBP" }, { id: 2, name: "Apple", price: "£0.20", emoji: "🍎", currency: "GBP" }, { id: 3, name: "Pineapple", price: "£1.05", emoji: "🍍", currency: "GBP" }, { id: 4, name: "Banana", price: "£0.20", emoji: "🍌", currency: "GBP" }, ];
Once you've completed this for all four products, your /data/products.js file should look a bit like this (with the price IDs copied from your Stripe dashboard):
export const products = [
  {
    id: "priceidgoeshere",
    name: "Watermelon",
    // 100 pence = £1
    price: 100,
    emoji: "🍉",
    currency: "GBP"
  },
  {
    id: "priceidgoeshere",
    name: "Apple",
    // 20 pence = £0.20
    price: 20,
    emoji: "🍎",
    currency: "GBP"
  },
  {
    id: "priceidgoeshere",
    name: "Pineapple",
    // 105 pence = £1.05
    price: 105,
    emoji: "🍍",
    currency: "GBP"
  },
  {
    id: "priceidgoeshere",
    name: "Banana",
    // 20 pence = £0.20
    price: 20,
    emoji: "🍌",
    currency: "GBP"
  },
];
Adding shopping cart logic to our project
The initial setup for use-shopping-cart is now complete, which means that we can start fixing the issues affecting our shopping cart functionality.
In the following sections, we'll utilize the features available in use-shopping-cart to address these issues and improve the overall user experience.
Using shouldDisplayCart to control shopping cart visibility
We can use the property shouldDisplayCart from use-shopping-cart to control the visibility of our shopping cart. This boolean property determines whether the cart should be displayed or hidden. Let's add it to our ShoppingCart component.
Go to the file /components/ShoppingCart.js and add the following line to the top of the file to import the useShoppingCart hook:
import { useShoppingCart } from "use-shopping-cart";
To make shouldDisplayCart available for use in our ShoppingCart component, we'll add the following line before the return statement of our ShoppingCart component:
const { shouldDisplayCart } = useShoppingCart();
We will also update the first div in the return statement of our function using TailwindCSS classes to add the styling that we want:
...
<div
      className={`bg-white flex flex-col absolute right-3 md:right-9 top-14 w-80 py-4 px-4 shadow-[0_5px_15px_0_rgba(0,0,0,.15)] rounded-md transition-opacity duration-500 ${
        shouldDisplayCart ? "opacity-100" : "opacity-0"
      }`}
    >
...
We have added the following:
A condition so that the cart has an
opacityof 1 whenshouldDisplayCartistrueand anopacityof 0 whenshouldDisplayCartis equal tofalse.The classes
transition-opacityandduration-500so that the transition between opacity is a bit smoother.
Using handleCartClick to toggle shopping cart visibility
Next, we need to make the shopping icon toggle the visibility of the cart when clicked.
To achieve this, we'll use the handleCartClick action from use-shopping-cart, which toggles the value of shouldDisplayCart between true and false.
Go to /components/NavBar.js and import the useShoppingCart hook at the top of the file:
import { useShoppingCart } from "use-shopping-cart";
Then, before the return statement, add the following line so we can reference handleCartClick in our NavBar component:
const { handleCartClick } = useShoppingCart();
Now, add an onClick function to our shopping cart icon button to trigger this function when clicking it:
<button className="relative" onClick={() => handleCartClick()}>
  <Image src="./cart.svg" width={40} height={40} alt="shopping cart icon" />
  <div className="rounded-full flex justify-center items-center bg-emerald-500 text-xs text-white absolute w-6 h-5 bottom-6 -right-1">
    0
  </div>
</button>
Give it a go! Your shopping cart should now open and close when clicking the shopping cart icon.
Using cartCount to keep track of the total products
NavBar component:
At the moment, the total number of items in our shopping cart is hardcoded. Let's use cartCount from use-shopping-cart instead, which tracks how many products are in the shopping cart.
Update the useShoppingCart hook in our NavBar component to also include the cartCount property:
const { handleCartClick, cartCount } = useShoppingCart();
Then, update the number 0 in the shopping cart icon button to be cartCount so that it correctly shows the total number of items in our cart:
<button className="relative" onClick={() => handleCartClick()}>
  <Image src="./cart.svg" width={40} height={40} alt="shopping cart icon" />
  <div className="rounded-full flex justify-center items-center bg-emerald-500 text-xs text-white absolute w-6 h-5 bottom-6 -right-1">
    {cartCount}
  </div>
</button>;
ShoppingCart component:
In the shopping cart, we either display the items in our cart or the message "You have no items in your cart". We are going to update the logic so that we use cartCount to determine what we show.
Update the useShoppingCart hook in our ShoppingCart component to also include the cartCount property:
const { shouldDisplayCart, cartCount } = useShoppingCart();
We can update the condition items.length > 0 to instead be cartCount && cartCount > 0 :
export default function ShoppingCart() {
  const { shouldDisplayCart, cartCount } = useShoppingCart();
  return (
    <div
      className={`bg-white flex flex-col absolute right-3 md:right-9 top-14 w-80 py-4 px-4 shadow-[0_5px_15px_0_rgba(0,0,0,.15)] rounded-md transition-opacity duration-500 ${
        shouldDisplayCart ? "opacity-100" : "opacity-0"
      }`}
    >
      {cartCount && cartCount > 0 ? (
        <>
          {items.map((item) => (
            <CartItem item={item} key={item.id} />
          ))}
          <CheckoutButton/>
        </>
      ) : (
        <div className="p-5">You have no items in your cart</div>
      )}
    </div>
  );
}
Using formatCurrencyString() to format prices
You might have noticed that the prices of the fruits are not displaying correctly anymore:
To help us with this, use-shopping-cart provides a client-side helper called formatCurrencyString(). We can import it into the Product component by adding the following line at the top of the file:
import { formatCurrencyString } from "use-shopping-cart";
Now, we can change the line in the Product component where we are outputting price to use this function:
<div className="text-2xl font-semibold mt-auto">
  {formatCurrencyString({ value: price, currency: "GBP" })}
</div>
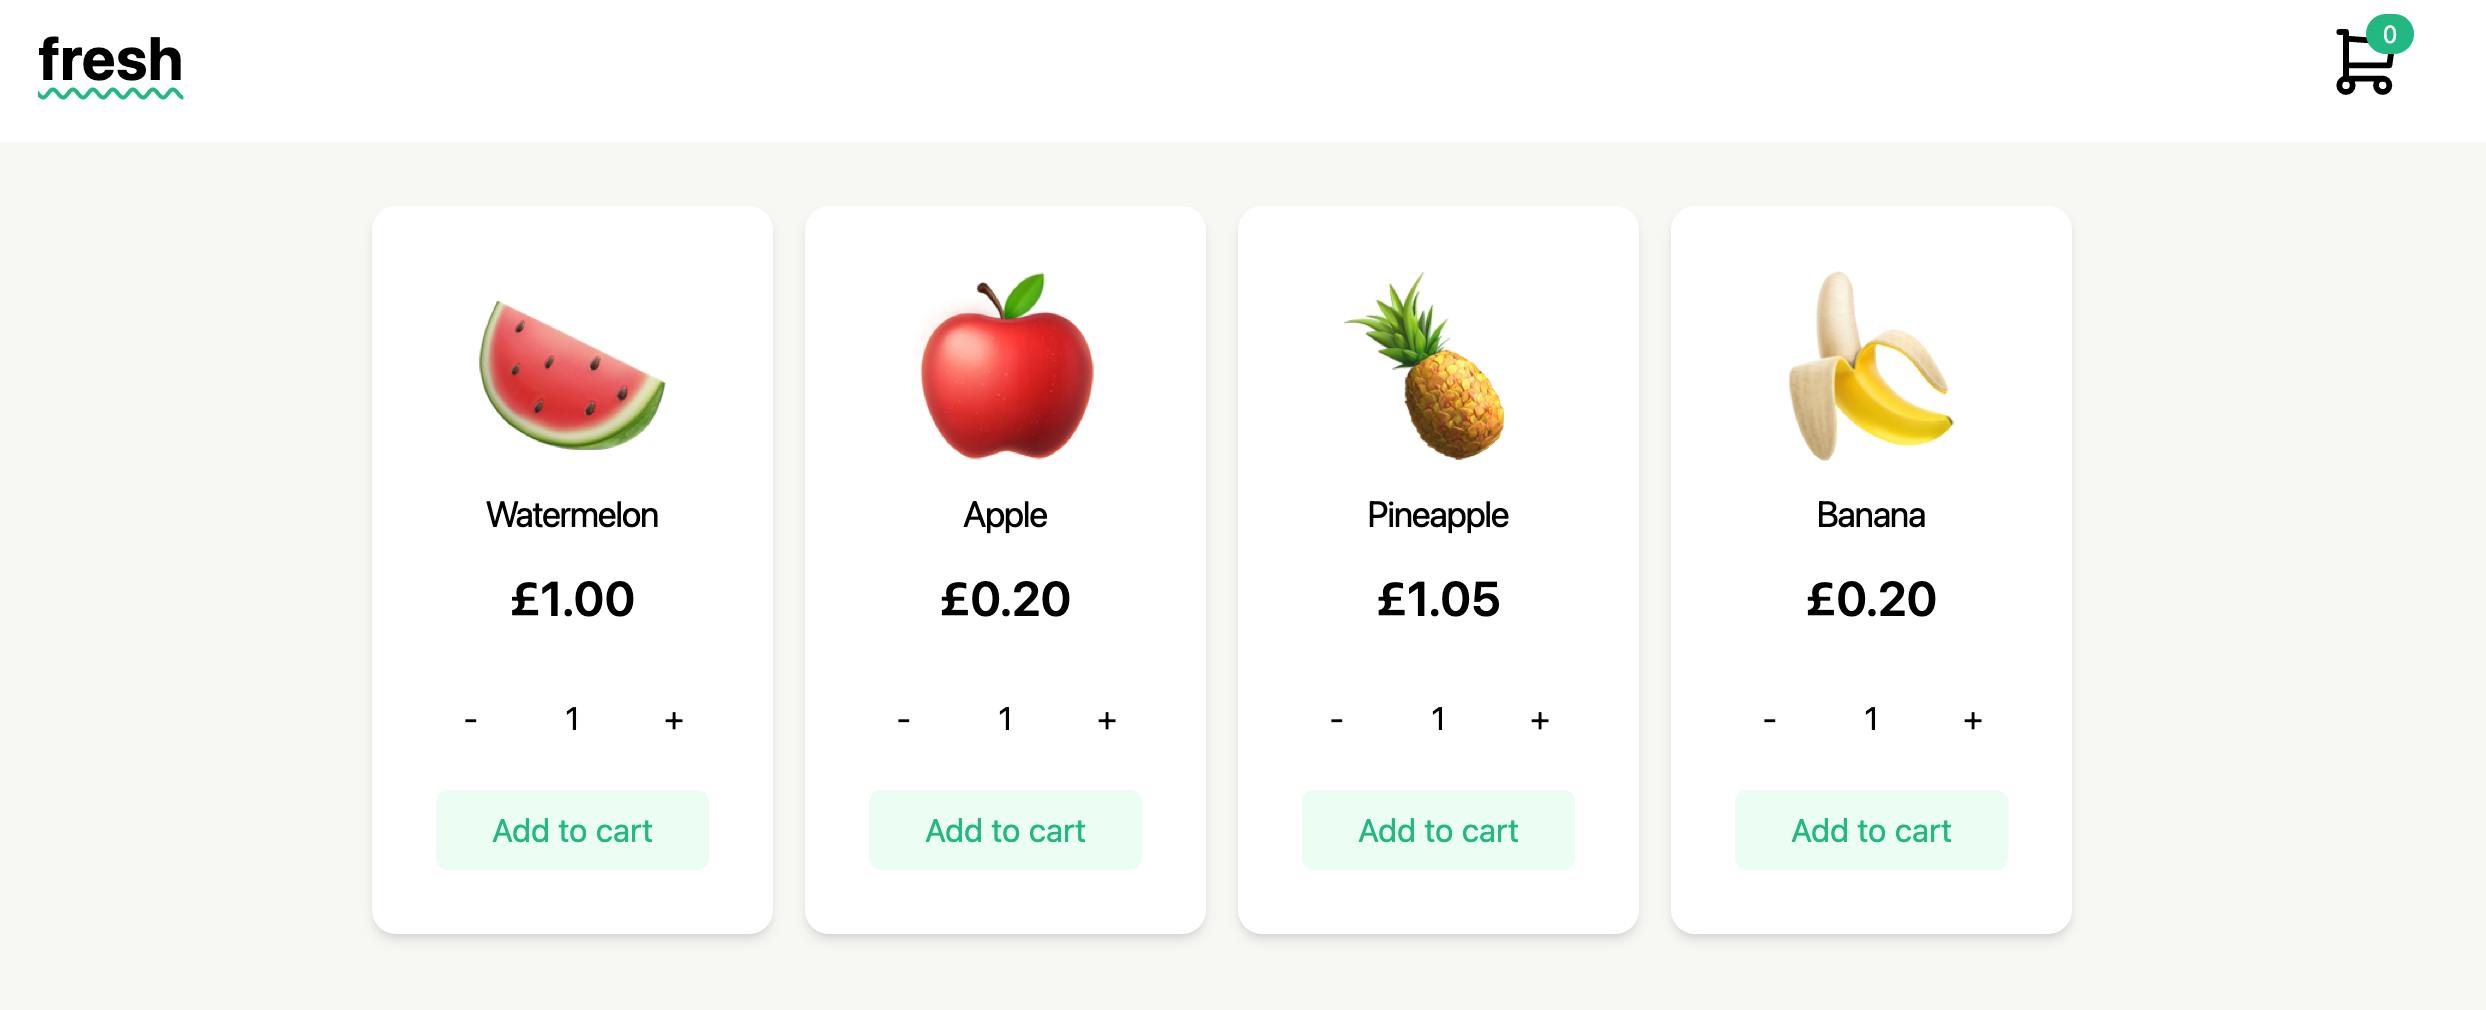
Now our prices should be displayed correctly:
Using addItem to add to our shopping cart
At the moment, when we click the "Add to cart" button, nothing happens.
We can use the addItem action from use-shopping-cart to add the fruits to our shopping cart.
Let's import useShoppingCart into our Product component:
import { useShoppingCart } from "use-shopping-cart";
Add the following line so we can reference the addItem action in our component:
const { addItem } = useShoppingCart();
Add the following addToCart function to the Product component. In this function, we are using the addItem action, passing the product information and quantity of items:
const addToCart = () => {
    addItem(product, { count: quantity });
  };
Add an onClick event to the "Add to cart" button that calls this function:
<button
  onClick={() => addToCart()}
  className="bg-emerald-50 hover:bg-emerald-500 hover:text-white transition-colors duration-500 text-emerald-500 rounded-md px-5 py-2"
>
  Add to cart
</button>
You should now be able to add items to your cart.
We can make a slight improvement. If we add an item with a quantity greater than 1 to our cart, the quantity remains the same. For example, adding 3 apples to the cart will result in the quantity staying at 3 even after clicking the "Add to cart" button:
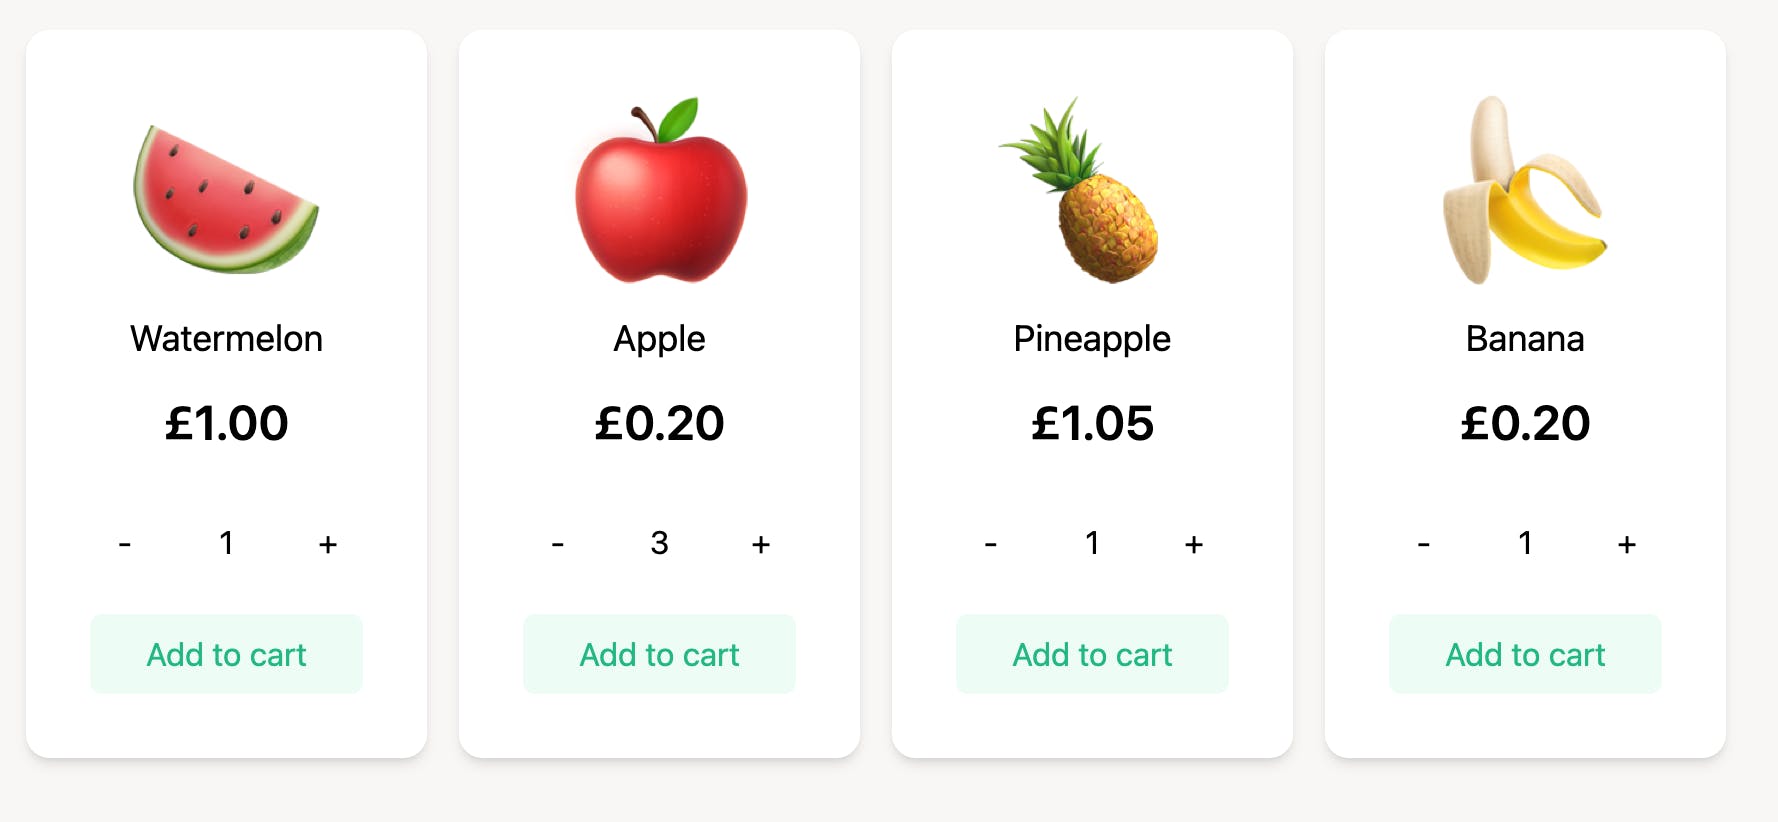
To avoid this, we should reset the quantity to 1 when the item is added. Add the following line to your addToCart function:
const addToCart = () => {
  addItem(product, { count: quantity });
  // We are adding this line, which resets the quantity back to 1
  setQuantity(1);
};
💡 Tip: If you refresh the page or close and reopen the website after adding items to your cart you'll notice that the number of cart items remains the same. This is because we set the shouldPersist property to true in our CartProvider component at the beginning. This ensures that the application uses local storage to remember the items in your cart.
Using cartDetails to display shopping cart items
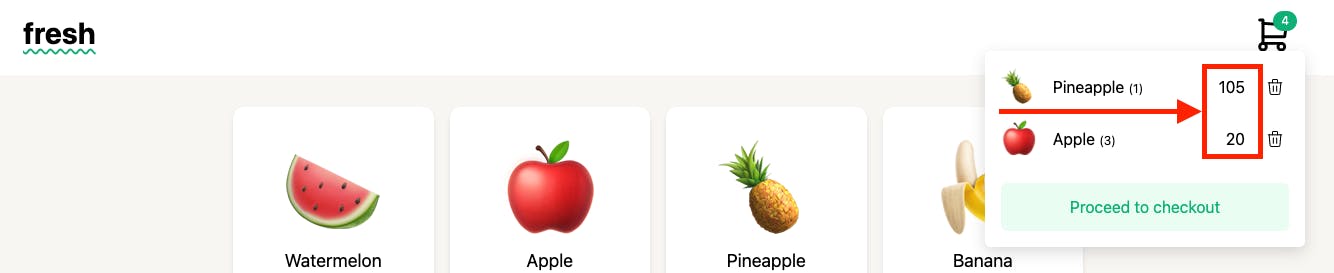
Although we are now adding items to our cart, when we open our shopping cart, we aren't correctly showing the cart items:

cartDetails is a property from use-shopping-cart that returns an object to show what's currently in your cart. We can use this property to fix our problem.
In the ShoppingCart component, let's update the useShoppingCart hook to include cartDetails:
// BEFORE
const { shouldDisplayCart, cartCount } = useShoppingCart();
// AFTER
const { shouldDisplayCart, cartCount, cartDetails } = useShoppingCart();
We are going to use the cartDetails object to create our CartItem components within our ShoppingCart component.
At the moment, our ShoppingCart component uses items, an empty array variable, to generate our CartItems:
{items.map((item) => (
    <CartItem item={item} key={item.id} />
))}
Delete the items variable and update the code to instead use cartDetails to generate cartItems . As cartDetails is an object, we can't use the array method map. Instead, we can replace the above code with:
{Object.values(cartDetails ?? {}).map((entry) => (
    <CartItem key={entry.id} item={entry} />
))}
Let's break down what this code is doing:
Object.values()is a built-in JavaScript method that returns an array of values of an object.cartDetails ?? {}uses the nullish coalescing operator (??). It returnscartDetailsif it's not null or undefined, and an empty object{}otherwise. This ensures thatObject.values()always has something to work with, even ifcartDetailsis undefined.We then use the
maparray method to generate aCartItemcomponent for each item in thecartDetailsobject
Now our shopping cart should be displaying our cart items:

Our final code for our ShoppingCart component should look like this:
import { useShoppingCart } from "use-shopping-cart";
import CartItem from "./CartItem";
import CheckoutButton from "./CheckoutButton";

export default function ShoppingCart() {
  const { shouldDisplayCart, cartCount, cartDetails } = useShoppingCart();
  return (
    <div
      className={`bg-white flex flex-col absolute right-3 md:right-9 top-14 w-80 py-4 px-4 shadow-[0_5px_15px_0_rgba(0,0,0,.15)] rounded-md transition-opacity duration-500 ${
        shouldDisplayCart ? "opacity-100" : "opacity-0"
      }`}
    >
      {cartCount && cartCount > 0 ? (
        <>
          {Object.values(cartDetails ?? {}).map((entry) => (
            <CartItem key={entry.id} item={entry} />
          ))}
          <CheckoutButton />
        </>
      ) : (
        <div className="p-5">You have no items in your cart</div>
      )}
    </div>
  );
}
Using removeItem to remove items from our shopping cart
Now that we have our shopping cart displaying items in our cart, we are going to add the functionality to remove items from our cart. removeItem is an action from use-shopping-cart that completely removes a product's entry from the cart by ID.
First, import the useShoppingCart hook in our CartItem component:
import { useShoppingCart } from "use-shopping-cart";
Next, to make removeItem available for use in our CartItem component, we'll add the following line:
const { removeItem } = useShoppingCart();
Then, add the following removeItemFromCart function using removeItem:
const removeItemFromCart = () => {
    removeItem(item.id);
  };
Finally, add it as an onClick event on the trash can icon button:
<button
  onClick={() => removeItemFromCart()}
  className="hover:bg-emerald-50 transition-colors rounded-full duration-500 p-1"
>
  <Image alt="delete icon" src="./trash.svg" width={20} height={20} />
</button>
You should now be able to remove items from your cart 🎉
But something's still not quite right with our shopping cart. See if you can remember how to correctly format the price of the shopping cart's items and have a go at implementing it.
🕵️♀️ Hint: Take a look at your Product component
You can take a look at the final code of the CartItem component here to check your work.
Adding Stripe checkout with redirectToCheckout
Our fruit shop application is looking great! In the next section, we will be implementing Stripe Checkout using redirectToCheckout from use-shopping-cart .
Stripe Checkout
Stripe Checkout is a customisable, secure payment page, hosted by Stripe, that enables businesses to accept payments online. With Checkout, you can securely accept and process payments from customers without having to handle sensitive payment information. Stripe Checkout provides a customisable payment form offering various payment methods, such as credit cards, Apple Pay and Google Pay. Checkout also offers support for subscription payments, billing, and fraud detection.
To use Stripe Checkout, we have to activate client-only integration on our Stripe account. Go to your checkout settings and scroll down until you see the Client-only integration section. Click the Enable client-only integration button.
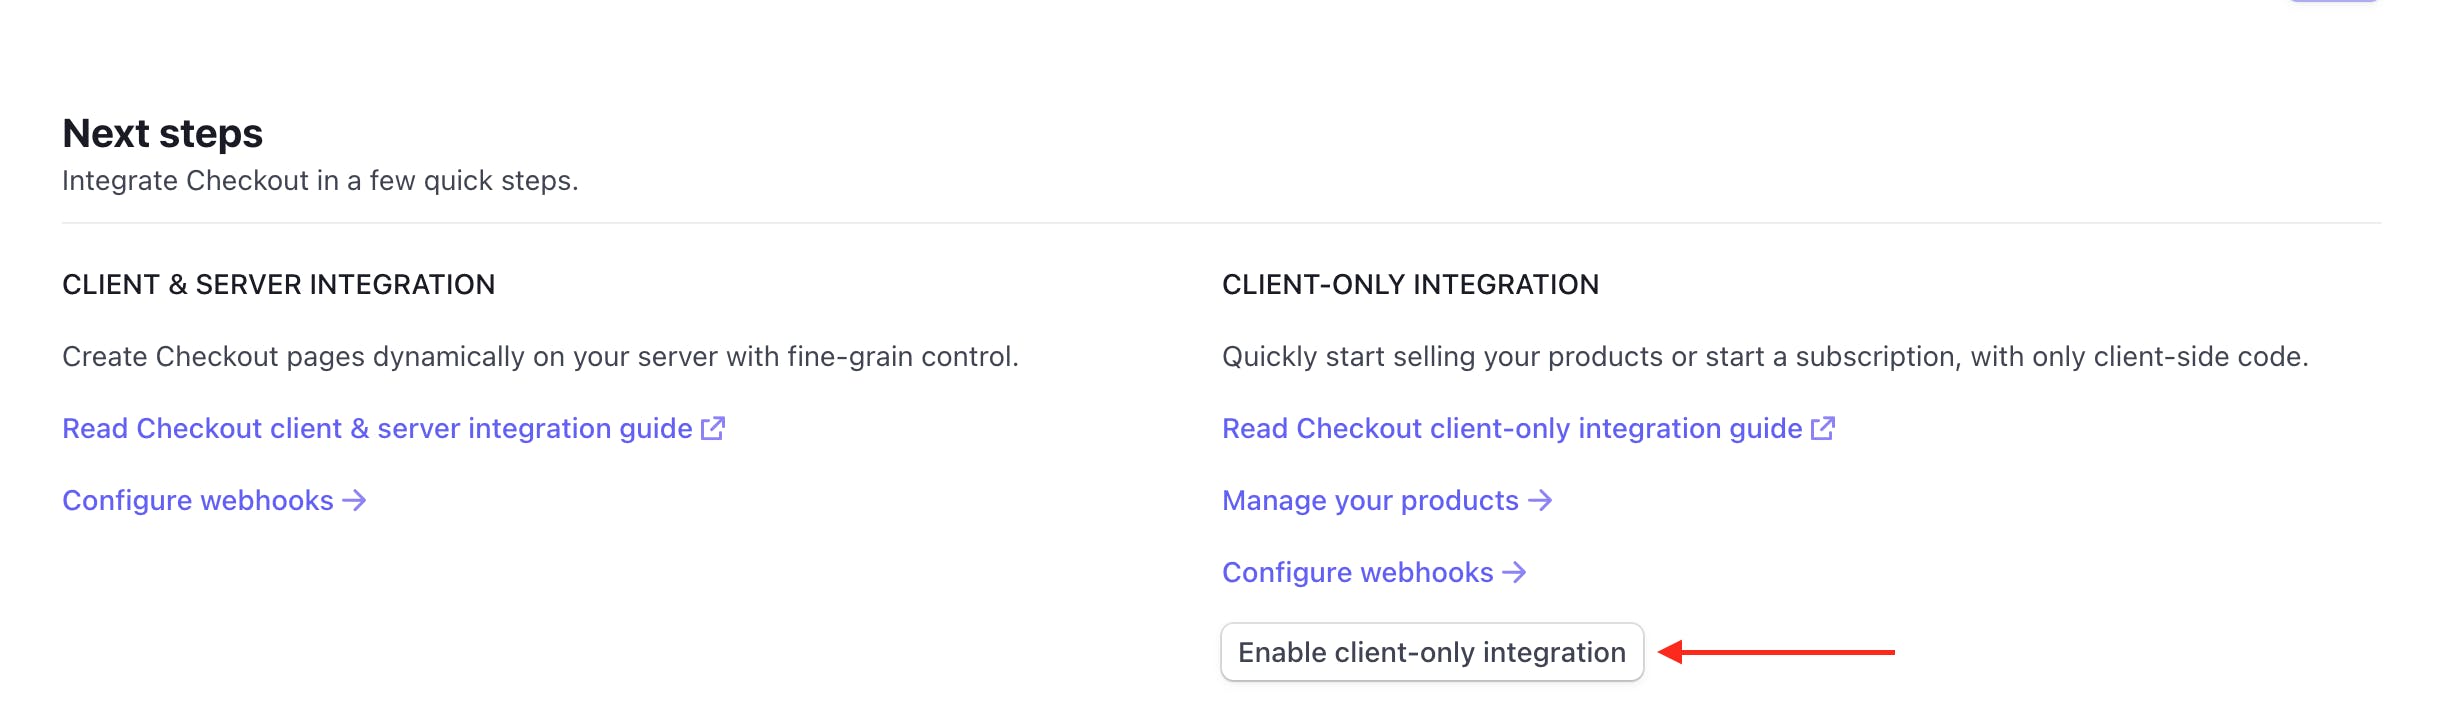
Clicking this means that you can use Stripe Checkout and ensures that the customer's payment information is securely collected and processed by Stripe.
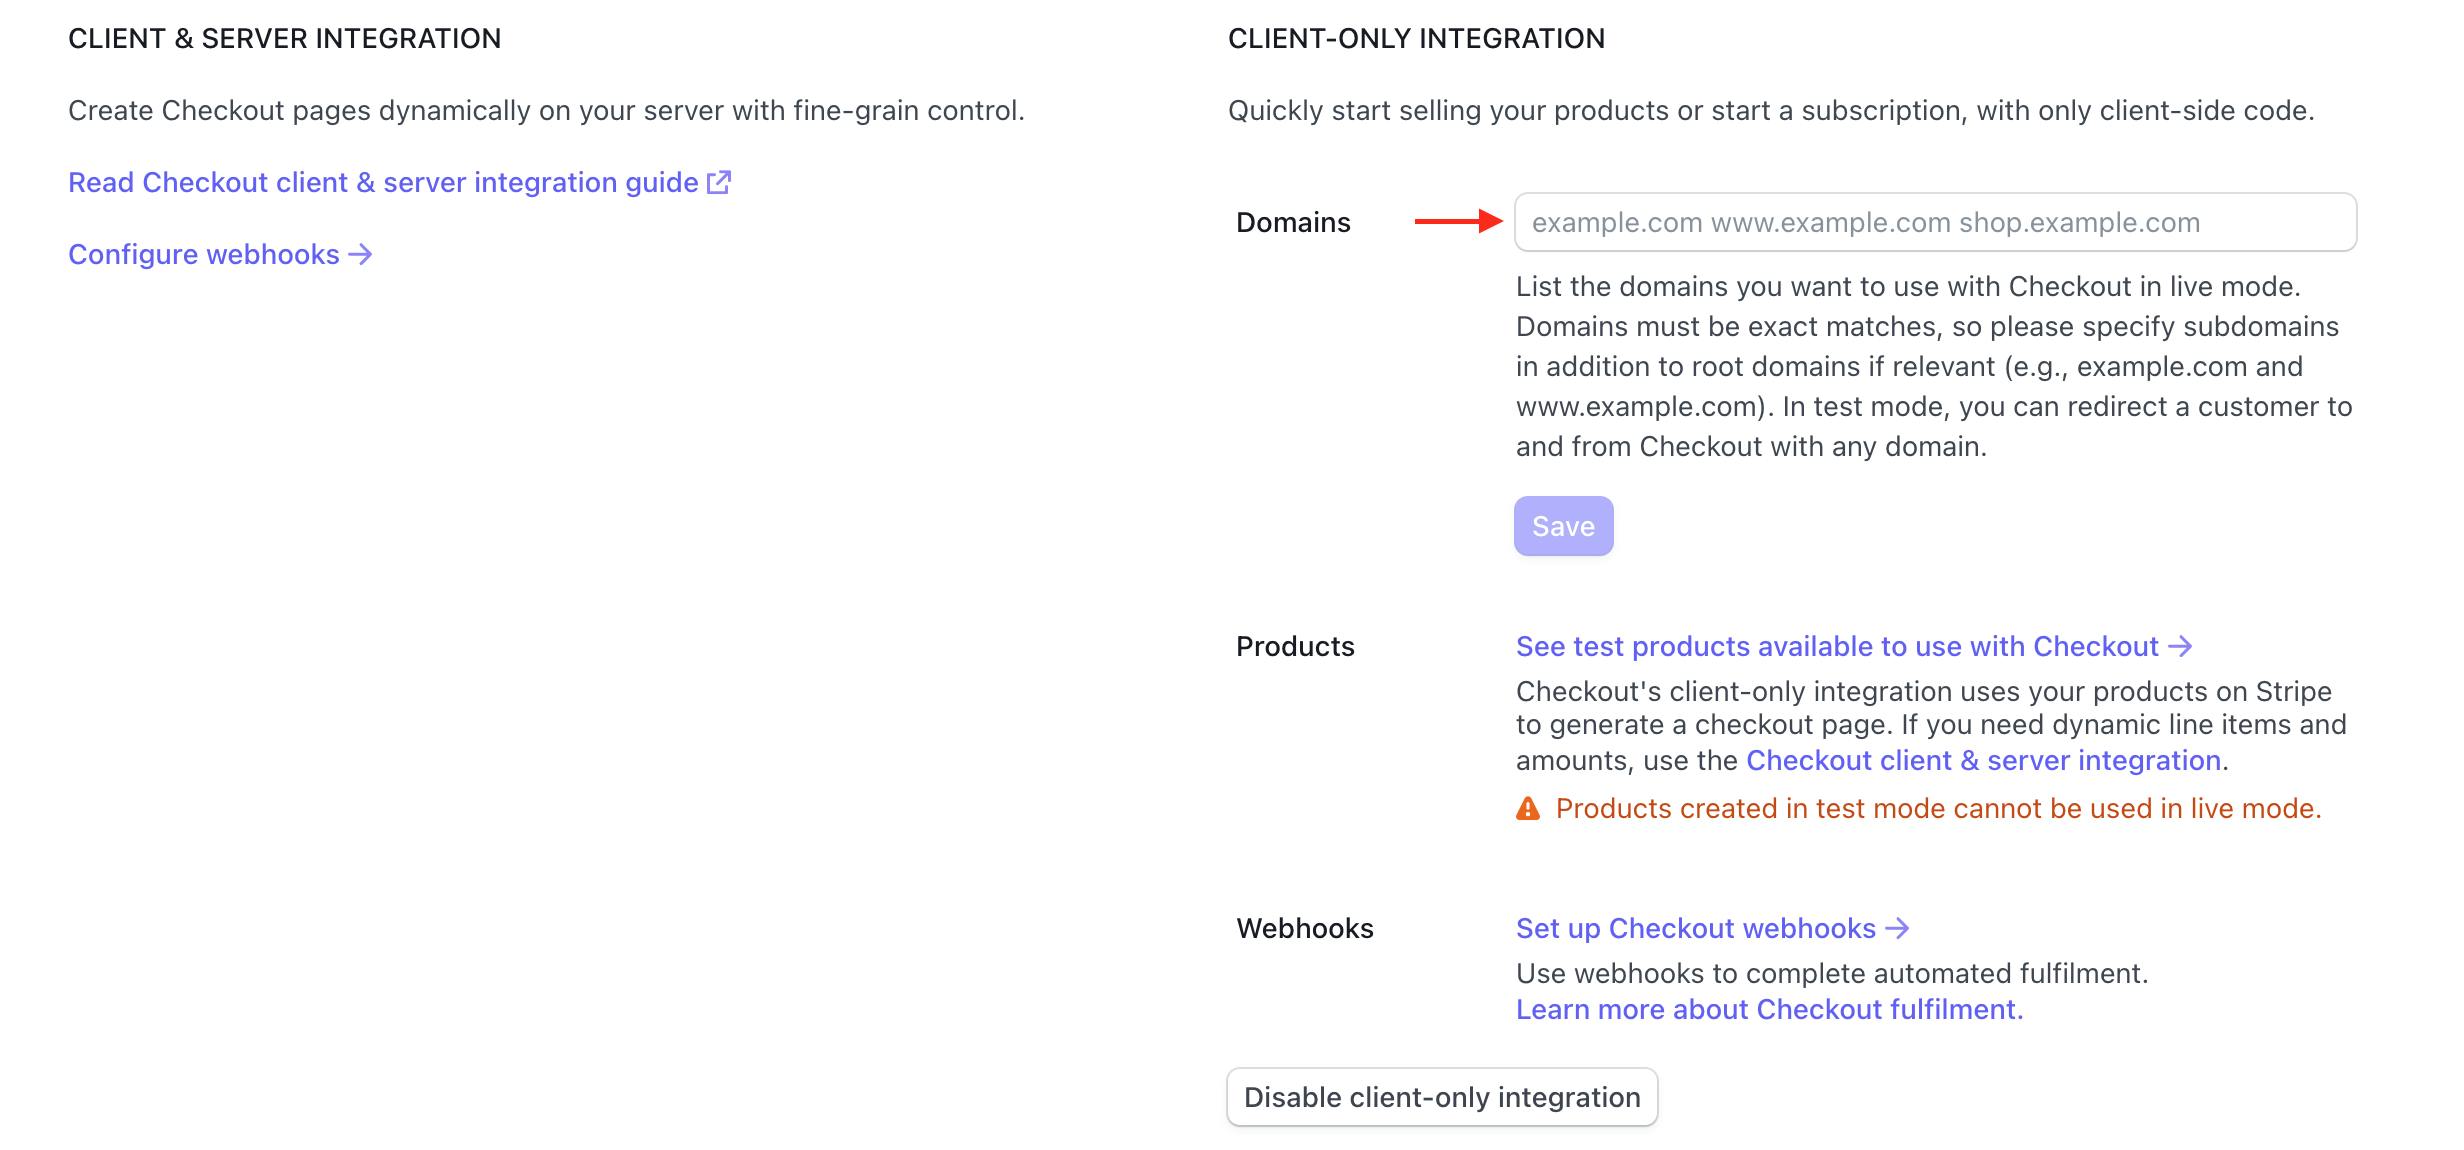
💡 Tip: If you plan to deploy your application, you'll need to add the domain of your application in the same section of checkout settings in order for Stripe to work:
Using redirectToCheckout in our application
Now it's time to connect our application to Stripe using redirectToCheckout from use-shopping-cart .
Import the useShoppingCart hook in the CheckoutButton component:
import { useShoppingCart } from "use-shopping-cart";
Add the following line to your CheckoutButton component so that you can use redirectToCheckout, cartCount and totalPrice:
const { redirectToCheckout, cartCount, totalPrice } = useShoppingCart();
Add the following handleClick async function:
async function handleClick(event) {
    event.preventDefault();
    if (cartCount > 0) {
      setStatus("loading");
      try {
        const result = await redirectToCheckout();
        if (result?.error) {
          console.error(result);
          setStatus("redirect-error");
        }
      } catch (error) {
        console.error(error);
        setStatus("redirect-error");
      }
    } else {
      setStatus("no-items");
    }
  }
Here, we are trying to redirect to Stripe Checkout and if something fails, we will set our status state to be redirect-error . If the cart has no items, we set the status to no-items.
We will add this function as an onClick function of our "Proceed to checkout" button and also improve our error handling. Stripe Checkout doesn't work if you have less than £0.30 in your basket, or if you have more than 20 items, so we are adding some extra validation to improve the user experience.
Update the return statement of our CheckoutButton component to the following:
return (
    <article className="mt-3 flex flex-col">
      <div className="text-red-700 text-xs mb-3 h-5 text-center">
        {totalPrice && totalPrice < 30
          ? "You must have at least £0.30 in your basket"
          : cartCount && cartCount > 20
          ? "You cannot have more than 20 items"
          : status === "redirect-error"
          ? "Unable to redirect to Stripe checkout page"
          : status === "no-items"
          ? "Please add some items to your cart"
          : null}
      </div>
      <button
        onClick={handleClick}
        className="bg-emerald-50 hover:bg-emerald-500 hover:text-white transition-colors duration-500 text-emerald-500 py-3 px-5 rounded-md w-100 disabled:bg-slate-300 disabled:cursor-not-allowed disabled:text-white"
        disabled={
          (totalPrice && totalPrice < 30) ||
          (cartCount && cartCount > 20) ||
          status == "no-items"
            ? true
            : false
        }
      >
        {status !== "loading" ? "Proceed to checkout" : "Loading..."}
      </button>
    </article>
  );
Let's break down these code updates:
We disable the "Proceed to checkout" button and output an error message if:
The total price of the cart is less than £0.30, or,
The cart has more than 20 items, or,
The cart is empty
We display an error message if we are unable to redirect to Stripe checkout, and print the error received from Stripe to the console.
You can now try testing out your application by adding some items to your cart and then clicking "Proceed to checkout".
You should be redirected to a Stripe-hosted page:
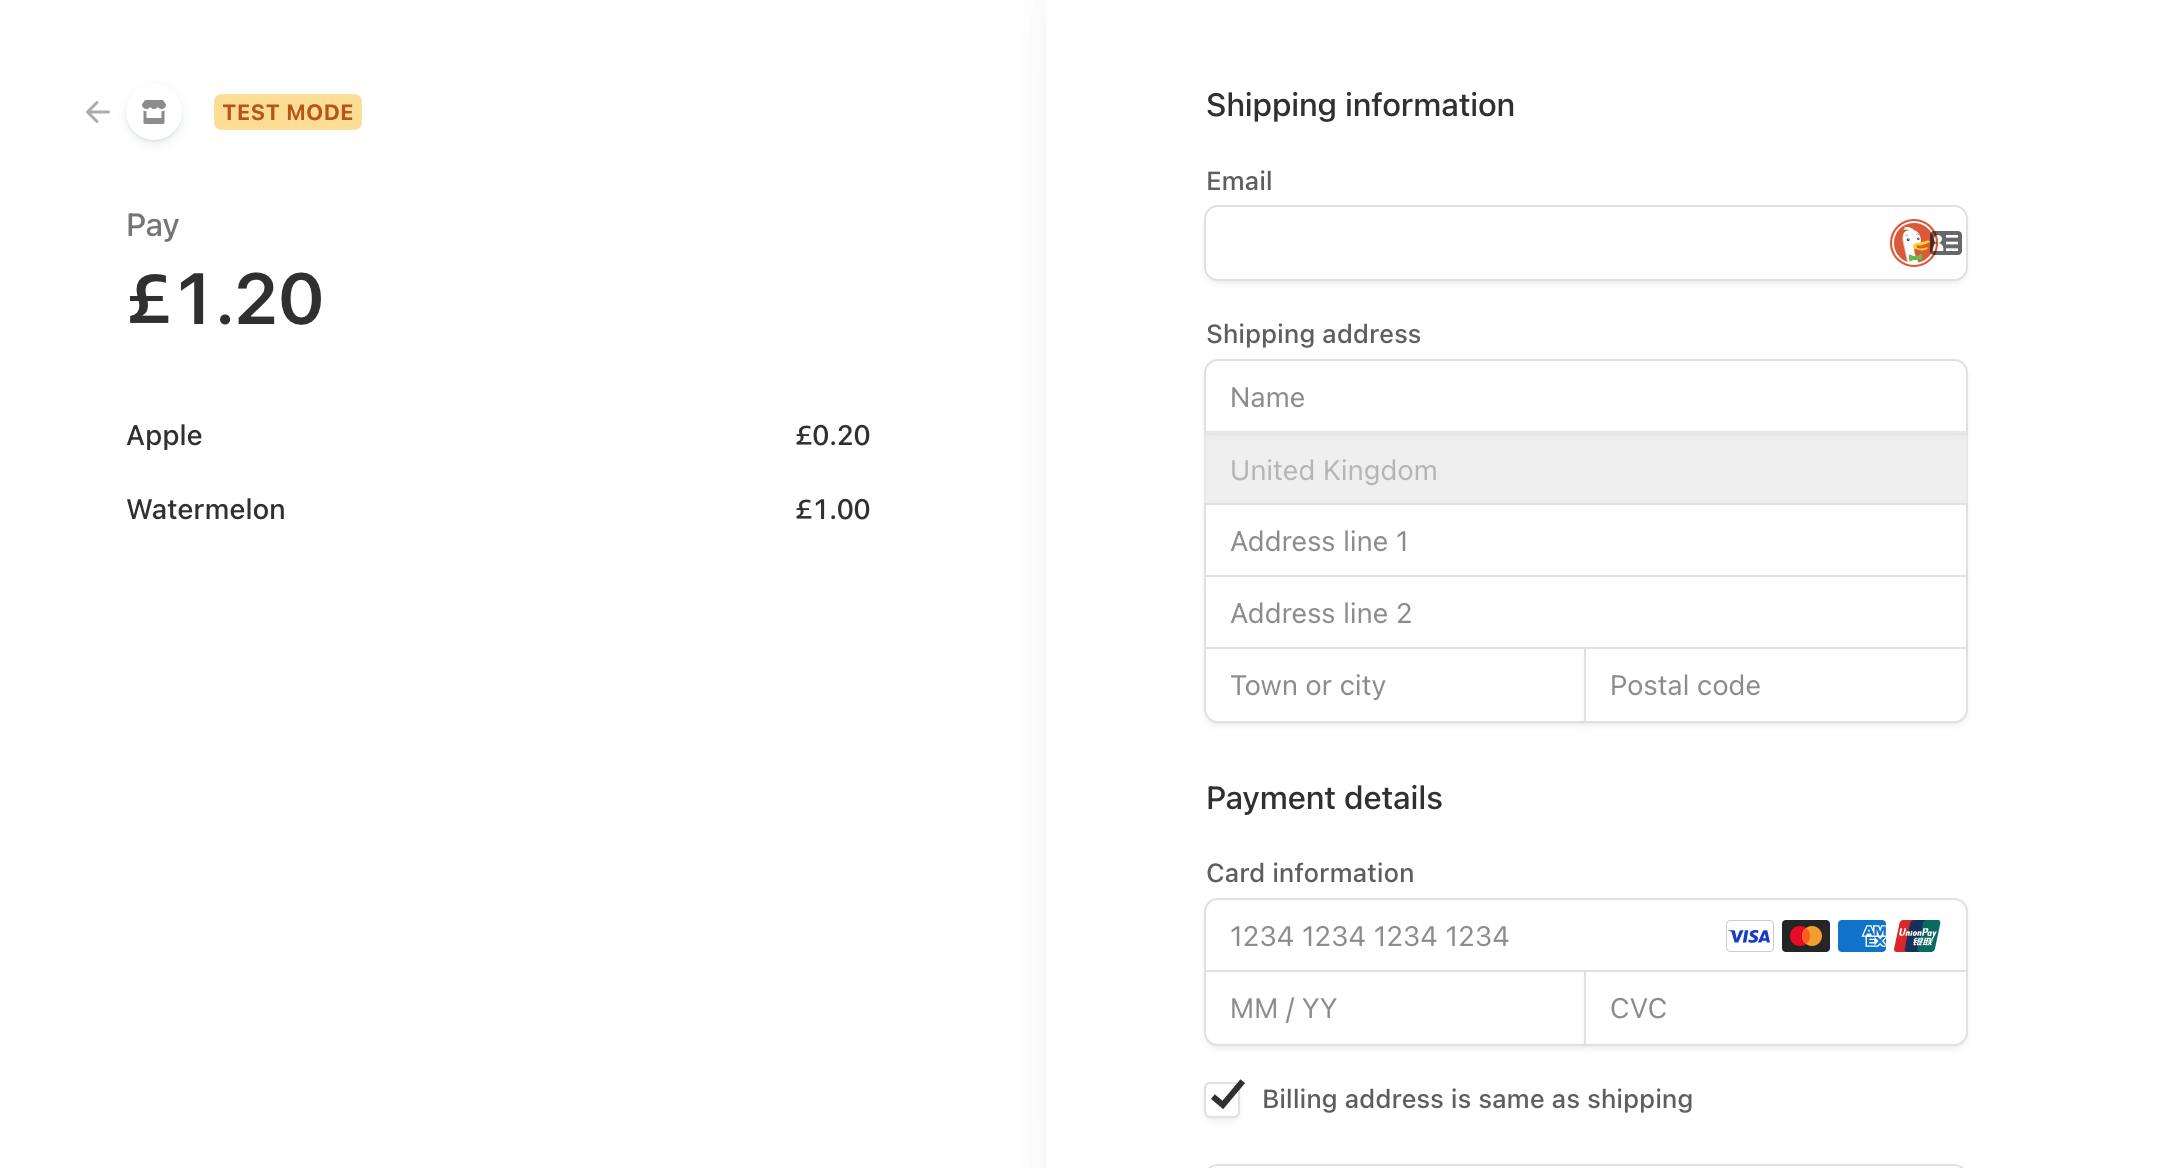
Enter a dummy email and address and use the following card details:
Card number: [4242 4242 4242 4242](tel:4242 4242 4242 4242)
Expiry date: Any valid future date, such as 12/34
Any three-digit CVC
Click Pay and you should be redirected to a simple /success page back on our web application.
Final improvement
You might notice that our total number of cart items hasn't changed even though we have completed payment.

Edit our success page /pages/success.js to include the following code to reset the cartCount on page load:
import { useShoppingCart } from "use-shopping-cart";
import { useEffect } from "react";

export default function Success() {
  const { clearCart } = useShoppingCart();

  useEffect(() => {
    clearCart();
  }, []);

  return <h1>Your payment was successful. Thank you for your purchase.</h1>;
}
Conclusion
And there you have it! 🎉 You now have the skills to create a simple e-commerce site using Next.js and use-shopping-cart. By following this tutorial, you've learned how to add Stripe Checkout and shopping cart functionality to your site, and you've seen how use-shopping-cart can simplify the process.
But don't stop here! Use this knowledge as a foundation to build your own e-commerce project using Next.js and use-shopping-cart. There are plenty of features available in the library, so explore the documentation and see what else you can do. And if you need help along the way, don't hesitate to leave a comment - I'll try my best to help!
Thank you for following along with this tutorial. I hope you found it helpful and informative. Don't forget to check out the final code on GitHub if you want to review or build upon what you've learned. And as always, happy coding!
P.S. If you enjoyed this tutorial or found it helpful, please leave a comment below to let me know! And if you got stuck at any point, feel free to leave a comment as well and I'll do my best to help you out 🙏🏼